This is an old revision of the document!
Scanning and using your own plug-ins
When scanning for plug-ins, Unify actually has to try to load each one. This will certainly trigger any copy-protection mechanisms it uses, and in some cases, may even cause Unify to crash. We therefore recommend the following “pro tips”.
Pro tips for scanning
- Scan using the stand-alone Unify app, not in your DAW.
- Avoid scanning your entire system if you can. It's perfectly OK to scan just one or a few folders at a time, and you can always come back another day to scan some more.
- Stay near your computer, so you can be ready to deal with e.g. pop-up authorization dialogs.
- Plug in any copy-protection dongles you have before scanning.
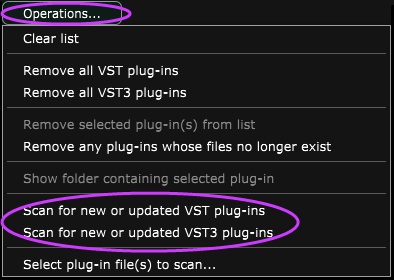
To scan your system for available plug-ins, begin by clicking the “Operations…” button at the bottom-left corner of the plug-ins view. This opens a small menu with several options, most of which are self-explanatory. The scan options are at the bottom:
Note the above screenshot was captured on a Windows system, which only supports VST and VST3 plug-ins. On a Mac, you would see a third option to scan for Audio Unit plug-ins.
Select the appropriate menu option for whichever plug-in format you want to scan for. If you choose to scan for Audio Unit plug-ins (on a Mac), the scan will begin right away. If you choose to scan VST or VST3 plug-ins, a dialog similar to the following will appear, asking you to choose which folders to look in:
The VST and VST3 standards do not specify exactly where plug-ins ought to be located, and many systems (especially Windows systems) may use quite a few different plug-in folders. It's up to you to know where these are, and how to specify the paths to them, just as you do for working with plug-ins in your DAW.
The “+” button at the bottom-left allows you to add another path to the list. You can click any path in the list to select it, and either use the “-” button to remove it or the “Change…” button to change the path. (Once you have selected any path in the list, you can use the arrow buttons to move it up or down and thus change the order in which the folders are scanned.)
VST/VST3 plug-ins are often stored in nested structures of folders, e.g., on a Windows system, you might have most plug-ins in, say, C:\Program Files\Common Files\VST2, which also contains a sub-folder called Plogue Art et Technologie, Inc, containing all of that company's plug-ins. If you select the top-level folder, Unify will scan into the sub-folder(s) as well, but you could also specify just the path to the sub-folder instead, and Unify would not attempt to scan all the others.
Once you have edited the folder list the way you want, click the “Scan” button to begin the scan. The dialog above will be replaced by another one showing the progress of the scan.
Unify may CRASH during scanning. This is actually normal (we're working on improving this), and all you need do is start Unify again, and re-start the scan, and it will continue from where it left off. This is the main reason why it's best to use the stand-alone Unify app, because if the Unify plug-in crashes, it will take your DAW down with it, and there will be more steps involved in re-starting.
Various pop-up windows may appear during scanning. This is why we advise staying near your computer, so you can click “OK” or whatever, to allow the scan to continue.
- On a Mac, you may see a pop-up saying that some plug-in needs to access information from your keychain, and you must enter your password to allow this. After entering your password, we advise that you click “Always Allow” instead of “Allow”, because you will probably have other plug-ins from the same vendor, which will also need this access.
- If you have any expired demo plug-ins on your system, you will probably see pop-ups reminding you that they are expired. You will usually need to click “OK” to continue.
- If any of your plug-ins requires a hardware dongle to work, you'll see a pop-up about that. You'll have to click “OK” to continue, and in some cases, the plug-in won't register properly, because it will be unable to start properly.
Once a scan eventually completes, you may see one or more items in red text at the bottom of the plug-in list, with an indication that they “appeared to be plug-ins” but couldn't be opened properly.
- In some cases, these are not plug-ins at all, but simply auxiliary files stored in the same folders. These can safely be ignored.
- Occasionally, you might see a file listed which you're pretty sure is a plug-in. Try the drag/drop method to re-scan just that file–this works in many cases.
We are well aware that Unify's plug-in scanning is far from perfect, and we hope to release an improved version in a future update. In the meantime, we appreciate your patience!


